ARRIVAL DATE

first day instructions:

    • Plan for flexibility: Make sure you have enough time to pick up your birds from the post office and stay home during their first day and night. Delivery times can vary, so be prepared for possible delays.
    • Prepare the brooder in advance: Set up the brooder area and test the heat source before the birds arrive. They should be placed in the brooder immediately upon arrival.
    • Limit handling: Avoid touching or playing with the birds during their first 24 hours to reduce stress.
    • Provide warm water: On the first day, offer drinking water at about 98°F (very warm). Newly arrived birds are small and lightweight, and they will drink a lot. If the water is too cool, it can lower their body temperature quickly, leading to shock or illness.
  • Take each chick, one at a time, and with your fingers hold the chick’s head and do a quick dip of the chick’s beak into the water and then let go of the chick.
  • You can add 1 teaspoon of sugar to 1 quart of very warm (98 degree) water and shake well.  Use this mixture for the first 4 hours and then change back to regular very warm water.

HEATING INSTRUCTIONS:

Always use brand new bulbs. We have found that using a drop light with reflector shield is a good source of heat.

  • Choose the right wattage: Select a bulb of 75, 100, or 150 watts based on your setup.
  • Lamp-to-chick ratio: Plan for one brooder lamp per 25 chicks.
  • Proper placement: Position the bulb about 18 inches above the floor to start. Adjust height depending on wattage and desired temperature.
  • Secure installation: Hang the reflector light from a sturdy support to prevent accidents or fire hazards.
  • Monitor temperature: Place a thermometer at floor level directly under the light for accurate readings.
  • Allow movement: Ensure chicks have enough space to move away from the heat source if they become too warm.
  • Temperature schedule:
    • Days 3–7: Maintain 95°F at floor level.
    • After that: Reduce temperature by 5°F each week until reaching 70–75°F.

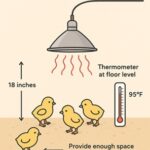
✅ What the diagram shows:

    • Brooder lamp with reflector shield positioned 18 inches above the floor.
    • Thermometer at floor level under the lamp for accurate readings.
    • Chicks with space to move away from the heat source.
    • Bulb wattage options: 75W, 100W, 150W.
    • Temperature schedule:
      • Days 3–7: 95°F
      • Reduce by 5°F weekly until reaching 70–75°F.

From days 3 through 7, the temperature in the brooder should be 95°F at floor level.  Then you will reduce it 5 degrees per week until the temperature reaches 70°-75°F.

  • Smaller breeds like Bantams often benefit from slightly warmer brooding temperatures, while fast-growing birds such as Jumbo Cornish Cross may require cooler conditions to prevent overheating.
  • To fine-tune the heat level, you can either adjust the height of the reflector lamp or switch to a bulb with a different wattage.
  • Maintaining the correct temperature is critical, so placing a thermometer at chick level is strongly advised.
  • Standard white bulbs are suitable for brooding, but red bulbs may help minimize feather pecking by reducing visual stimulation.
  • After the first two weeks, it’s recommended to transition to a heat source that doesn’t rely on lights such as an infrared hanging heater—to avoid the stress and behavioral issues that constant brightness can cause.
  • During this changeover, keep an eye out for chicks piling together, which may indicate discomfort or inadequate warmth.

FEED

first day instructions:

  • Use a chick starter/grower feed.
  • Sprinkle feed on the paper towel.  The chicks find the feed easier in this way at the start.

For the first day, scatter the starter feed on paper towels so the chicks can easily find it. After that, switch to trough-style feeders placed low enough for the chicks to see and reach. Plan on about one foot of trough space—or one round feeder—for every 25 chicks and make sure feed is always available.

A small amount of finely crumbled boiled egg yolk sprinkled over the feed can encourage young chicks to begin eating. Be sure to remove any leftover egg after a couple of hours so it doesn’t spoil. Avoid offering grit at this stage; chick starter/grower feed is already formulated for proper digestion. Keep chicks on a complete starter/grower ration until they begin laying.

WATERING INSTRUCTIONS

• Begin with a 1-gallon, low-profile waterer for every group of 25–50 chicks.
• Do not add medication to the water during the first eight hours after arrival.
• The first drink should be very warm water (90–105°F) to help maintain body temperature.
• For the next two days, keep the water warm; by the third day, room temperature water is fine.
• Chicks will be thirsty after shipping, so offer water immediately. Dip each chick’s beak into the warm water before releasing them into the brooder to teach them where to drink.
• Most chick losses occur because they fail to start eating or drinking due to being too cold to move.
• Always ensure fresh water is available—never let chicks run out.

SPECIAL SITUATIONS AFTER THE CHICKS ARRIVE

if the chicks had a rough trip:

INSTEAD OF USING THE STANDARD FEED AND WATER SUGGESTIONS LISTED ABOVE, TRY THIS:

  • Put 1 teaspoon of sugar in 1 quart of 100°F water and shake well.
  • Add a little of this water mixture to a small amount of feed, stir and sprinkle it around the chicks.
  • Mix only right before you are ready to put it in the feed. Do a small amount at a time.

AS THEY EAT IT, MIX SOME MORE AND SPRINKLE IT AROUND THEM TO GET THEIR ATTENTION. NEVER LEAVE THIS MIXTURE FOR MORE THAN A COUPLE OF HOURS; IT WILL SOUR AND CAUSE ILLNESS.

PASTY BUTT: “PASTING UP”:

When you are raising baby chicks from their early stages of development, your chicks could develop something called “pasty butt.”  Sometimes the stress of shipping causes the manure to stick to the back of the chick.  It is important to remove this daily. Pull off gently using a warm washcloth.  It will disappear in a day or so as the chick starts to grow.

How to Prevent Pasty Butt?

Chickens have one hole that is used for laying eggs, pooping, urinating and mating.  This hole is called the cloacal vent.  A chick’s mother hen keeps her chicks’ cloacal vents clear, but if you are raising the chicks yourself, the vent can become clogged, and you end up “pasty butt.”   I have read that this can happen during shipping – some say from temperature changes, some say from stress.  A chick can actually die from pasty butt because it cannot poop until the pasty butt is cleared.   The result:  you need to clean your chicks’ bottoms.  Use a warm washcloth and move it slowly on the chicks’ bottoms.  You can use a Q-tip and olive oil or mineral oil to rub around the vent and surrounding area.

How to Clean Pasty Butt?

Unfortunately, it can be a bit of a problem to clean pasty butt in baby chickens.   Some people actually run the pasty butts under warm water to help dissolve the poo.   Make sure your room is well heated.  Dry the chicks off before putting them with the other chicks so their bottoms do not draw attention.   You may end up plucking some of the pasty goop, irritating the skin, which then may cause other chicks to peck at it.

Check your chicks’ bottoms daily for the first few days to look for buildup, because this is the only way I know how to prevent pasty butt!

MEDICATION:

You should always have Amprol medication on hand when raising baby chicks.  Do not give them medication unless there is an obvious reason to do so.  Also, never give medication right away upon arrival.  The chicks are too thirsty and can easily overmedicate themselves.  If they appear weak, droopy, have diarrhea, or continue to have pasty bottom, then you can give them medication (only after the first 8 hours and never mix it with the sugar water or any other meds).

We recommend the use of Amprol for medication of these symptoms.  You should be able to find it at your local feed store.

CHICK BEHAVIOR BEST INDICATOR OF COMFORTABLE TEMPERATURE

Bedding Guidelines for Baby Chicks

  • Best materials: Use large pine shavings for bedding. Alternatives include rice hulls, dry straw, or hay.
  • Avoid dangerous options: Do not use fine shavings or sawdust—chicks may ingest these while learning to eat, which can be fatal.
  • Never use sand: It can be eaten and cause crop impaction, leading to serious health issues or death.
  • Layer thickness: Spread bedding across the floor at least 1–2 inches deep. For concrete floors, increase to 3–5 inches for insulation and comfort.
  • Toxic woods: Avoid cedar or cypress shavings as they are harmful to poultry.

SPACE:

  • Try to provide ½ square foot per chick at the start.

For starting 50 chicks, use a draft shield and make a circle about 5 to 6 feet across.  For 100 chicks, make a circle 7 to 8 feet across

BABY TURKEYS

ollow the general care guidelines, but pay extra attention to poults—young turkeys are more prone to chilling than chicks and often need more help getting started. They can be slow to recognize feed and water, so it’s important to guide them early.
To encourage drinking, place brightly colored marbles in the water founts. For feeding, scatter starter feed on paper towels for the first few days to make it more visible. If poults don’t begin eating and drinking promptly, they may fail to thrive.
If you notice loose droppings, consider adding a sulfa-based medication (such as Sulmet) to their water, following the dosage instructions on the label.
Avoid using slick bedding materials like glossy paper—turkeys lack the leg strength to stay upright on slippery surfaces, which can lead to spraddle leg. Use textured bedding that provides traction.
Raising a few standard-size chicks alongside your poults can be helpful. Chicks tend to be more active and curious, and their behavior often encourages turkeys to eat and drink by example.

DUCKS & GOSLINGS

Care for ducklings and goslings is similar to caring for baby chicks, but they generally don’t need supplemental heat for as long because they grow so quickly. They do, however, require more attention around their waterers, as they tend to be much messier.


IMPORTANT: Never add medications to the drinking water of ducks or geese.

  • Keep waterfowl separate from chicks and turkeys during brooding.
  • Use a sturdy waterer that won’t tip over into the bedding. In rare cases where birds arrive extremely stressed from shipping, you may need to limit water briefly—but never provide feed unless water is available.
  • Weather permitting, young ducks and geese can go outdoors earlier than other poultry. Goslings in particular will start nibbling on grass and weeds as soon as they have access.
  • Do not allow ducklings or goslings onto a pond while they are still covered in down. Without a mother to oil their feathers, they can become waterlogged and drown.
  • Once they are fully feathered—usually between 2 and 3 months depending on breed—they can safely enjoy pond access.

Ducks and geese can be brooded together, but they should not be raised with chicks, turkeys, or other land birds. Their constant splashing creates wet conditions that can make other species sick. After they reach maturity, waterfowl can free-range alongside other birds as long as there is plenty of space.

GUINEAS

Use the basic instructions for chicks; however, watch them more carefully for pilling up.  The temperature may need to be slightly higher for the smaller bodied birds.  Usually 99°- 100°F for the first week, then lower it 5 degrees per week until about 70°F.  The temperature must be closely monitored.

A thermometer is highly recommended.  Special game bird water founts can be purchased.  If you are using regular chick founts, add clean gravel or marbles to take up space so they do not drown or get chilled.  You should use a colored bulb to help control cannibalism.  We do not recommend wire flooring at a young age because it is a good possibility that their legs will get caught in the wire.

SAFE HANDLING OF POULTRY

Live animals and pets can be a source of potentially harmful microorganisms (germs including salmonella and bacteria).  Therefore, precautions must be taken when handling and caring for them to prevent fecal/oral transmission among people.  Children should be supervised as they handle animals and pets to make sure they do not put their hands or fingers in their mouth.  Always wash your hands with soap and warm water after handling animals.

PLEASE NOTE: It’s very important to follow the care and brooding instructions to the letter to ensure chicks get a good start.  We guarantee all poultry to arrive alive and in good condition.  The Chick Hatchery will not be responsible for any losses due to neglect.

Purchase 15 or more total poultry, avoid a Small Order Fee!

Orders of 3- 14 total poultry are charged a $25.00 Small Order Fee.

Started Pullets are the quickest way to start a flock that will be laying soon!

The challenging work of raising young chicks has been done for you.

Testimonials

What our clients are saying